预习视频
【最新】零基础快速入门React 17.x
视频P38-P55
今日学习目标
1、掌握redux概念与使用
2、掌握react-redux的使用
一、何时用Redux?【了解】
首先明确一点,Redux 是一个有用的架构,但不是非用不可。事实上,大多数情况,你可以不用它,只用 React 就够了。
曾经有人说过这样一句话:
"如果你不知道是否需要 Redux,那就是不需要它。"
Redux 的创造者 Dan Abramov 又补充了一句:
"只有遇到 React 实在解决不了的问题,你才需要 Redux 。"
简单说,如果你的UI层非常简单,没有很多互动,Redux 就是不必要的,用了反而增加复杂性。
从项目角度看,如果你出现了以下情况,就可以考虑使用Redux:
* 用户的使用方式复杂
* 不同身份的用户有不同的使用方式(比如普通用户和管理员)
* 多个用户之间可以协作
* 与服务器大量交互,或者使用了WebSocket
* View要从多个来源获取数据
从组件角度看,如果你的应用有以下场景,可以考虑使用 Redux:
* 某个组件的状态,需要共享
* 某个状态需要在任何地方都可以拿到
* 一个组件需要改变全局状态
* 一个组件需要改变另一个组件的状态
发生上面情况时,如果不使用 Redux 或者其他状态管理工具,不按照一定规律处理状态的读写,代码很快就会变成一团乱麻。你需要一种机制,可以在同一个地方查询状态、改变状态、传播状态的变化。
总之,不要把 Redux 当作万灵丹,如果你的应用没那么复杂,就没必要用它。另一方面,Redux 只是 Web 架构的一种解决方案,也可以选择其他方案。
二、Redux设计思想【了解】
Redux 的设计思想很简单,请记住这两句话:
* Web应用是一个状态机,视图与状态是一一对应的。
* 所有的状态,保存在一个对象里面。
Redux三大原则:
三、流程图剖析【了解】
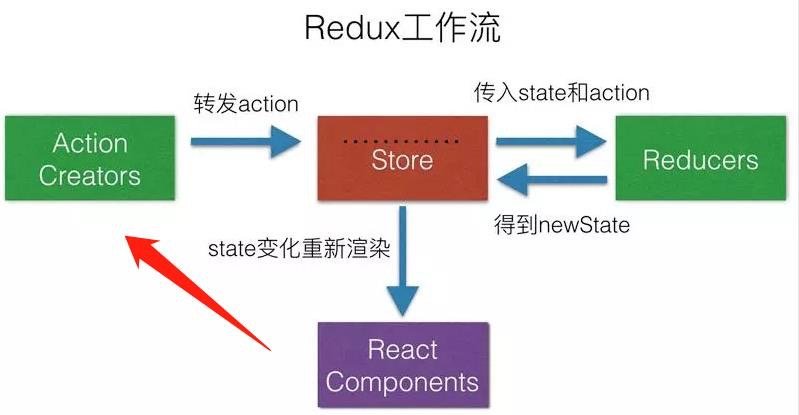
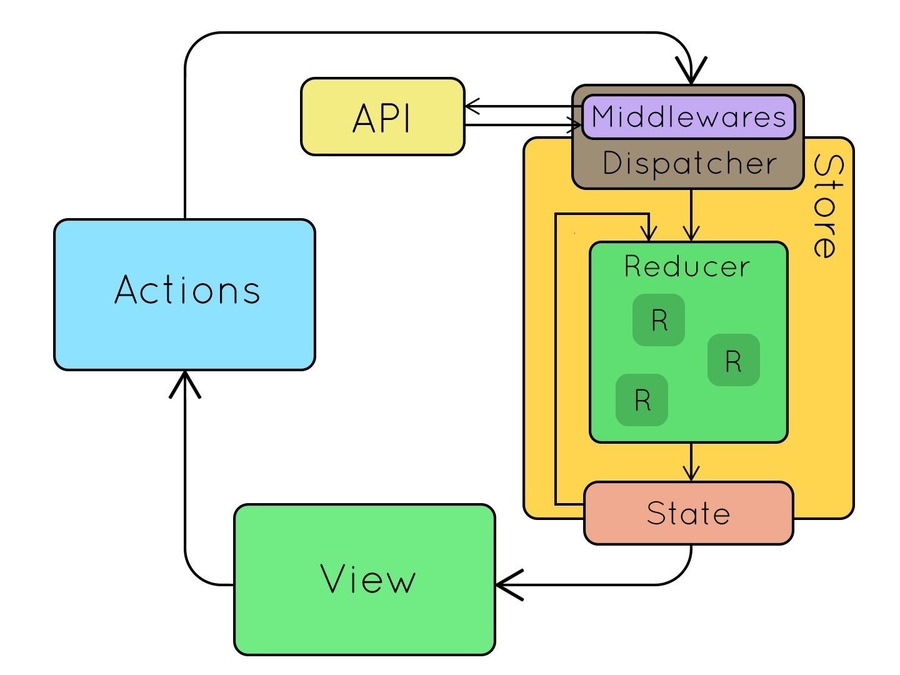
来看看Redux流程图(Redux Flow):
四、案例与API结合【重要】
我们来完成一个TodoList:
1、创建项目+安装redux与antd
// 创建项目
npx create-react-app todolist
// 安装redux
yarn add redux
// 安装antd
yarn add antd
2、页面基本结构
src目录下,只保留:index.js
与 TodoList.js
两个文件,其余全部删掉。
index.js
中:
import React from 'react'
import ReactDOM from 'react-dom'
import TodoList from './TodoList'
ReactDOM.render(
<TodoList />,
document.getElementById('root')
)
TodoList.js
中:
import React, { Component } from 'react'
import 'antd/dist/antd.css'
import { Input, Button, List } from 'antd'
const inputVal = "写点文字";
const list = [
"来了来了",
"第二条信息很刺激",
"这一条也不错"
]
export default class TodoList extends Component {
render() {
return (
<div>
<div style={{ margin: '20px' }}>
<Input
placeholder="请输入文字"
value={inputVal}
style={{ width: '250px', marginRight: "10px" }}
/>
<Button type="primary">增加</Button>
</div>
<div style={{ margin: '10px', width: '300px' }}>
<List bordered dataSource={list} renderItem={item => (<List.Item>{item}</List.Item>)}></List>
</div>
</div>
)
}
}
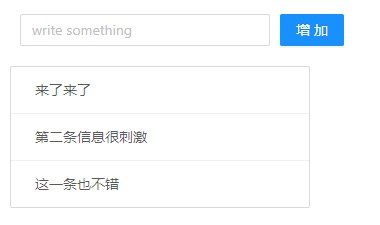
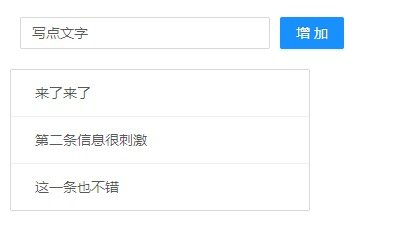
效果如图:
3、Store与Reducer
src目录下创建store文件夹,作为仓库使用。在其中新建 index.js
与 reducer.js
,分别写:
store/index.js
中:
// 引入createStore对象
import { createStore } from 'redux'
// 引入reducer
import reducer from './reducer'
const store = createStore(reducer);
export default store;
reducer.js
中:
// 定义默认状态值(即默认数据)
const defaultState = {
// input的文字
inputVal: "写点文字",
// 列表项数组
list: [
"来了来了",
"第二条信息很刺激",
"这一条也不错"
]
}
// 导出一个函数,用于返回state
export default (state = defaultState, action) => {
return state;
}
这里做个补充:
以上代码中,将原本写在 TodoList.js
文件中的数据,拿到reducer中,此时 TodoList.js
中就会缺少数据,这时候,我们对它进行修改:
TodoList.js
中:
...
// 引入store
import store from './store'
export default class TodoList extends Component {
constructor(props) {
super(props)
// 获取仓库中的状态
this.state = store.getState()
}
render() {
return (
<div>
...
<Input
...
{/* 这里修改value的值从仓库中获取 */}
value={this.state.inputVal}
/>
...
<List
...
{/* 这里修改dataSource的值从仓库中获取 */}
dataSource={this.state.list}
></List>
...
</div>
)
}
}
以上代码中,为了简洁,做了很多省略,目的是方便大家看到核心代码。
4、安装Redux DevTools
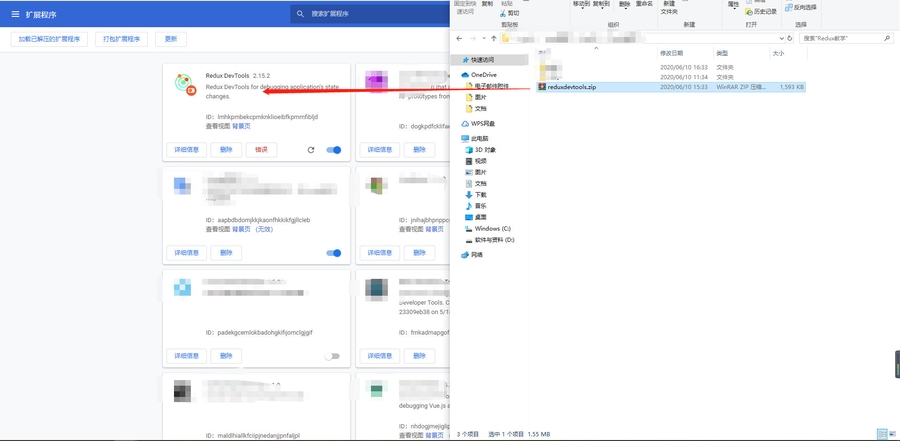
通常我们会希望在浏览器中调试Redux状态值,因此,将这个程序包直接拽入Chrome的扩展程序:
就是这个压缩包(注意:不要解压,直接拽入即可!!!):
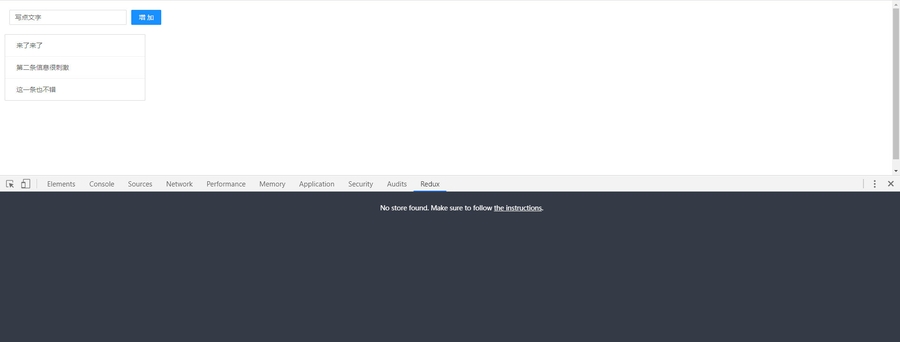
安装好插件后,关闭当前项目页面,再重新打开页面,然后打开控制台,能看到这个界面,就算安装成功:
最后,在 store/index.js
中添加这句:
window.__REDUX_DEVTOOLS_EXTENSION__ && window.__REDUX_DEVTOOLS_EXTENSION__()
添加后的 store/index.js
整体为:
// 引入createStore对象
import { createStore } from 'redux'
// 引入reducer
import reducer from './reducer'
const store = createStore(
reducer,
window.__REDUX_DEVTOOLS_EXTENSION__ && window.__REDUX_DEVTOOLS_EXTENSION__()
);
export default store;
五、事件驱动【重要】
1、Input的输入事件
当input输入时,我们需要修改输入框的值,于是:
TodoList.js
中:
export default class TodoList extends Component {
// 获取仓库中的状态
state = store.getState()
render() {
return (
...
<Input
...
value={this.state.inputVal}
onChange={this.changeInput.bind(this)}
/>
...
)
}
// 输入框输入事件
changeInput(e){
console.log(e.target.value); // 得到值
}
}
当然,我们要修改的是store中的值,但唯一能触发store修改值的,是通过Action,因此,我们需要在输入事件中,创建一个action对象:
// 输入框输入事件
changeInput(e){
console.log(e.target.value); // 得到值
// 创建action对象
const action = {
type: "changeInputValue", // type属性是必须要写的,用于校验
value: e.target.value, // value代表要修改为什么值
}
// 将action用dispatch方法传递给store
store.dispatch(action);
}
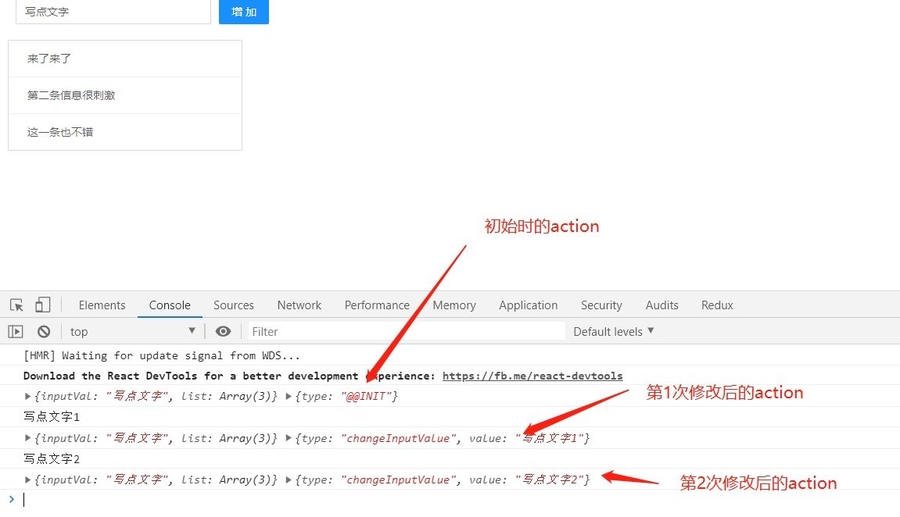
此时,由于store只是一个仓库,它会自动将action转发给reducer。我们可以在reducer中打印一下:
// 导出一个函数,用于返回state
export default (state = defaultState, action) => {
console.log(state, action) // 对传入进来的值进行打印
return state;
}
结果如下:
如此,我们成功了。但我们只是打印了出来,我们真正要修改的是输入框可以看到的文字,于是:
我们先判断type
是不是正确的,如果正确,我们需要从新声明一个变量newState
。(记住:Reducer里只能接收state,不能改变state。),所以我们声明了一个新变量,然后再次用return
返回回去。
来看看代码实现:
export default (state = defaultState, action) => {
console.log(state, action)
// reducer只能接收state,不能直接对它进行改变
if(action.type === "changeInputValue"){
let newState = JSON.parse(JSON.stringify(state)); // 对原本的state做一次深拷贝
newState.inputVal = action.value; // 重新赋值action过来的value
return newState;
}
return state;
}
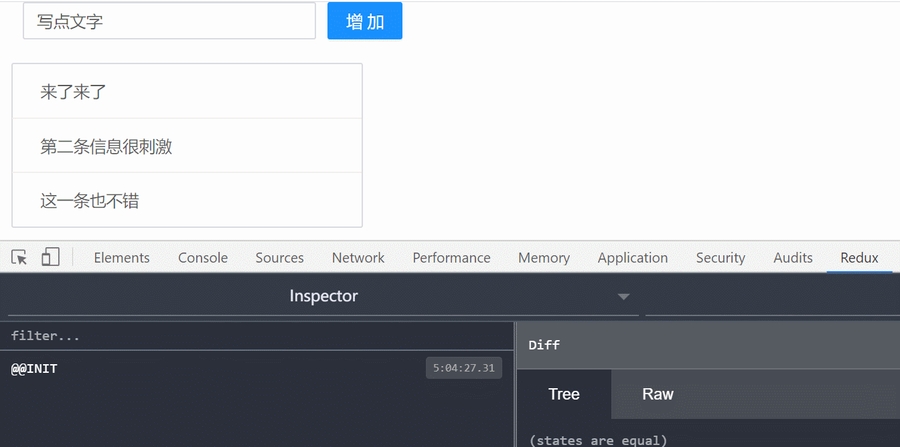
此时,来看看效果:
可以看到,我在修改输入框的值,控制台显示的状态是改变了,但输入框的文字没变。因为我们没有订阅 。
2、订阅
使用订阅可以解决以上问题:
TodoList.js
中:
import React, { Component } from 'react'
import 'antd/dist/antd.css'
import { Input, Button, List } from 'antd'
// 引入store
import store from './store'
export default class TodoList extends Component {
constructor(props) {
super(props)
// 获取仓库中的状态
this.state = store.getState()
store.subscribe(this.storeChange.bind(this)) //订阅Redux的状态
}
...
storeChange() {
this.setState(store.getState())
}
...
}
现在我们搞定了!
But!
这样做说实话不太方便,于是从4.0.5版本开始,非受控组件也可以不用写订阅了。
既然是非受控组件,那么input身上就不能绑定value值。所以,删掉input标签的value属性,以及刚写的订阅,也可以实现。但这就不能给input提供初始值,只能将初始值挂靠在placeholder身上。所以这里不太建议大家删掉这个value和订阅。
3、按钮点击事件(增加列表项)
TodoList.js
中:
export default class TodoList extends Component {
...
render(){
return (
...
<Button type="primary" onClick={this.handleClick.bind(this)}>增加</Button>
...
)
}
// 点击事件
handleClick(){
const action = {
type: "click_fn"
}
store.dispatch(action);
}
...
}
reducer.js
中:
// 导出一个函数,用于返回state
export default (state = defaultState, action) => {
// reducer只能接收state,不能直接对它进行改变
if(action.type === "changeInputValue"){
...
}
if(action.type === "click_fn"){
let newState = JSON.parse(JSON.stringify(state)); // 对原本的state做一次深拷贝
newState.list.unshift(newState.inputVal); // 插入列表中的第一项
newState.inputVal = ''; // 清空输入框
return newState;
}
return state;
}
4、双击删除列表项
接下来,我们实现一个功能:
通过双击列表项,删除该列表项
TodoList.js
中:
<List
bordered
dataSource={this.state.list}
renderItem={
(item, index) => (
{/*
这里注意:下面这个方法可以使用箭头函数,避免this的指向问题,同时如果后期有需要做组件拆分,那就必须使用箭头函数。
*/}
<List.Item onDoubleClick={()=>this.delListItem(index)}>{item}</List.Item>
)
}>
</List>
// 双击删除列表项
delListItem(index){
// 创建action对象
const action = {
type: "delListItem", // type属性是必须要写的,用于校验
value: index
}
// 将action用dispatch方法传递给store
store.dispatch(action);
}
reducer.js
中:
// 导出一个函数,用于返回state
export default (state = defaultState, action) => {
if(action.type === "delListItem"){
let newState = JSON.parse(JSON.stringify(state)); // 对原本的state做一次深拷贝
newState.list.splice(action.value, 1) // 删除指定项
return newState;
}
return state;
}
此时,我们实现了双击删除的功能,但我们的reducer有很多if判断,所以我们可以酌情改为 switch...case
,这完全看你个人心情。
reducer.js
的改写:
// 定义默认状态值(即默认数据)
const defaultState = {
// input的文字
inputVal: "写点文字",
// 列表项数组
list: [
"来了来了",
"第二条信息很刺激",
"这一条也不错"
]
}
// 导出一个函数,用于返回state
export default (state = defaultState, action) => {
let newState = JSON.parse(JSON.stringify(state)); // 对原本的state做一次深拷贝
// reducer只能接收state,不能直接对它进行改变
switch (action.type) {
case "changeInputValue":
newState.inputVal = action.value; // 重新赋值action过来的value
return newState;
case "click_fn":
newState.list.unshift(newState.inputVal); // 插入列表中的第一项
newState.inputVal = ''; // 清空输入框
return newState;
case "delListItem":
newState.list.splice(action.value, 1); // 删除指定项
return newState;
default:
break;
}
return state;
}
5、课堂练习
使用Redux完成累加功能
Add.js:
import React, { Component } from 'react'
import store from './store'
export default class Add extends Component {
constructor(p){
super(p)
this.state = store.getState()
store.subscribe(this.storeChange.bind(this))
}
render() {
return (
<div>
<h2>{this.state.num}</h2>
<button onClick={this.handleClick.bind(this)}>按钮</button>
</div>
)
}
storeChange(){
this.setState(store.getState())
}
handleClick(){
const action = {
type: "add_num",
value: 1
}
store.dispatch(action)
}
}
store.js:
import { createStore } from 'redux'
import Reducer from './reducer'
const store = createStore(
Reducer,
window.__REDUX_DEVTOOLS_EXTENSION__ && window.__REDUX_DEVTOOLS_EXTENSION__()
)
export default store;
reducer.js:
/*
reducer只能读取state,不能修改state
*/
// 定义默认的state数据
const defaultState = {
// 数字
num: 0
}
// 导出(一开始的时候,state作为形参,其实并没有值,所以让它等于defaultState)
export default (state = defaultState, action) => {
// 进行一步深拷贝
var newState = JSON.parse(JSON.stringify(state));
// 通过判断action中的type,来看是否需要修改
switch (action.type) {
case "add_num":
newState.num+=action.value;
break;
default:
break;
}
return newState;
}
六、ActionTypes【熟悉】
实际开发中,我们会写很多个action,其中的type就会出现很多个,因为每个action中必带一个type,这样就导致我们要找一个bug会比较难,而且不可复用。所以我们将action的type抽离出来,成为 actionTypes.js
文件:
export const CLICK_FN = "click_fn";
export const CHANGE_INPUT_VALUE = "changeInputValue";
export const DEL_LIST_ITEM = "delListItem";
然后在 reducer.js
和 TodoList.js
两个文件中引入并修改:
reducer.js
中:
import { CLICK_FN, CHANGE_INPUT_VALUE, DEL_LIST_ITEM } from './actionTypes'
...
// 导出一个函数,用于返回state
export default (state = defaultState, action) => {
let newState = JSON.parse(JSON.stringify(state)); // 对原本的state做一次深拷贝
// reducer只能接收state,不能直接对它进行改变
switch (action.type) {
case CHANGE_INPUT_VALUE:
newState.inputVal = action.value; // 重新赋值action过来的value
return newState;
case CLICK_FN:
newState.list.unshift(newState.inputVal); // 插入列表中的第一项
newState.inputVal = ''; // 清空输入框
return newState;
case DEL_LIST_ITEM:
newState.list.splice(action.value, 1) // 删除指定项
return newState;
default:
break;
}
return state;
}
TodoList.js
中:
...
import { CLICK_FN, CHANGE_INPUT_VALUE, DEL_LIST_ITEM } from './store/actionTypes'
export default class TodoList extends Component {
...
// 点击事件
handleClick(){
const action = {
type: CLICK_FN
}
store.dispatch(action);
}
// 订阅调用的事件
storeChange() {
this.setState(store.getState())
}
// 输入框事件
changeInput(e) {
console.log(e.target.value);
// 创建action对象
const action = {
type: CHANGE_INPUT_VALUE, // type属性是必须要写的,用于校验
value: e.target.value, // value代表要修改为什么值
}
// 将action用dispatch方法传递给store
store.dispatch(action);
}
// 双击删除列表项
delListItem(index){
// 创建action对象
const action = {
type: DEL_LIST_ITEM, // type属性是必须要写的,用于校验
value: index
}
// 将action用dispatch方法传递给store
store.dispatch(action);
}
}
当然,这还是不够简洁,毕竟有很多重复性的action堆在每个页面中,所以我们需要创建一个 store/actionCreator.js
,专门用来写action。
七、ActionCreator【熟悉】
store/actionCreator.js
中:
import { CLICK_FN, CHANGE_INPUT_VALUE, DEL_LIST_ITEM } from './actionTypes'
// 点击事件
export const clickFnAction = () => {
return {
type: CLICK_FN // type属性是必须要写的,用于校验
}
}
// 输入框事件
export const changeInputValueAction = (val) => {
return {
type: CHANGE_INPUT_VALUE, // type属性是必须要写的,用于校验
value: val
}
}
// 双击删除列表项
export const delListItemAction = (val) => {
return {
type: DEL_LIST_ITEM, // type属性是必须要写的,用于校验
value: val
}
}
将原本所有定义action的代码都搬到这份文件,然后在 TodoList.js
中引入这份文件:
...
import { clickFnAction, changeInputValueAction, delListItemAction } from './store/actionCreator'
export default class TodoList extends Component {
...
// 点击事件
handleClick(){
const action = clickFnAction();
store.dispatch(action);
}
// 订阅调用的事件
storeChange() {
this.setState(store.getState())
}
// 输入框事件
changeInput(e) {
const action = changeInputValueAction(e.target.value);
// 将action用dispatch方法传递给store
store.dispatch(action);
}
// 双击删除列表项
delListItem(index){
const action = delListItemAction(index);
// 将action用dispatch方法传递给store
store.dispatch(action);
}
}
八、Redux总结
我们来对Redux进行一个总结:
1、store必须是唯一的,多个store是坚决不允许,只能有一个store空间
2、只有store能改变自己的内容,Reducer不能改变
3、Reducer必须是纯函数
其中,我们解释第三点:
很多新手会在reducer每个判断中,去增加Axios请求,但类似于请求这个东西,返回出来的结果都是由后台工程师决定的,你也不知道返回出来的结果是不是函数,所以请大家不要在这些判断中写任何请求、获取时间戳等事件。
九、Redux-thunk中间件【了解】
Redux-thunk
是Redux最常用的插件。什么时候会用到这个插件呢?比如在Dispatch
一个Action
之后,到达reducer
之前,进行一些额外的操作,就需要用到middleware
(中间件)。在实际工作中你可以使用中间件来进行日志记录、创建崩溃报告,调用异步接口或者路由。 这个中间件可以使用是Redux-thunk
来进行增强(当然你也可以使用其它的),它就是对Redux中dispatch
的加强。
首先 thunk 来源自 think 的”过去式“ -- 作者非常特别的幽默感。主要意思就是声明一个函数来代替表达式,这样就可以将执行求值操作(evaluation)延迟到所需要的时刻。
1、安装插件
npm install --save redux-thunk
2、配置
这里注意,按照官方文档的配置,是没法成功的,这里提供正确的配置方法。
store/index.js
中,做如下修改:
// 引入createStore对象
import { createStore, applyMiddleware ,compose } from 'redux'
import thunk from 'redux-thunk'
// 引入reducer
import reducer from './reducer'
// 利用compose创造一个增强函数
const composeEnhancers = window.__REDUX_DEVTOOLS_EXTENSION_COMPOSE__ ?
window.__REDUX_DEVTOOLS_EXTENSION_COMPOSE__({}):compose
// 通过增强函数,把thunk引入进来
const enhancer = composeEnhancers(applyMiddleware(thunk))
const store = createStore(reducer, enhancer); // 创建数据存储仓库
export default store;
3、使用方法
以往我们在页面中的异步行为(数据请求或定时器),可以迁移到 actionCreator.js
中:
// 这里以异步累加举例:
export const asyncAddNumFn = (data) => {
return {type: 'AsyncAddNumFn', value: data}
}
页面中:
import {asyncAddNumFn} from './store/actionCreator'
export default class Count extends Component {
...
render() {
return (
<div style={{textAlign: 'center'}}>
<h2>{this.state.num}</h2>
<Button type="primary" onClick={this.addNumFn.bind(this)}>累加</Button>
</div>
)
}
addNumFn(){
// 把action转移到了actionCreator中
// const action = {
// type: "addNumFn",
// value: num
// }
// 异步得到的数字
setTimeout(()=>{
store.dispatch(asyncAddNumFn(num))
}, 2000)
}
...
}
这里其实有个比较麻烦的点,我还得先套一个promise,这样代码比较多。如果我可以将这个setTimeout也转移到actionCreator中,那么代码就比较少了。
actionCreator.js
中:
// 以高阶函数的形式书写
export const asyncAddNumFn = (data) => (
return (dispatch) => {
setTimeout(() => dispatch({ type: 'AsyncAddNumFn', value: data }), 2000)
}
)
页面中:
addNumFn(){
// redux-thunk会自动注入dispatch给actionCreators
store.dispatch(asyncAddNumFn(2))
}
除了redux-thunk之外,还有redux-saga等中间件。
十、Redux-saga中间件(扩展)
github地址:https://github.com/axelav/redux-saga
saga 是英语 传奇 的意思。它的思想是 拦截。redux-saga 是 redux 一个中间件,用于解决异步问题。redux-saga基于ES6的Generator,大家可以先预习:Generator与function*。
Saga的 redux-saga/effects
中有几个关键字:
fork:创建一个新的进程或者线程,并发发送请求。
put:发送对应的 dispatch,触发对应的 action
takeEvery:监听对应的 action,每一次 dispatch 都会触发
takeLatest:监听对应的 action,只会触发最后一次 dispatch
all:跟 fork 一样,同时并发多个 action,没有顺序。
由于redux-thunk与redux-saga两者作用大致相同,但redux-saga需要基于generator,写起来也较为复杂,这里只做个概念普及,有兴趣的同学可以自行查阅文档学习。
十一、React-Redux是什么?【了解】
React-Redux
这是一个React生态中常用组件,它可以简化 Redux
流程,其实就是简化版的 Redux
。
十二、安装与引入【熟悉】
1、安装
npm install --save react-redux
npm install --save redux
2、引入并使用redux
我们新建一个项目,保留 App.js
、 index.js
、store/index.js
和 store/reducer.js
,我们通过React-redux来实现累加。
App.js
中:
import React, { Component } from 'react'
import store from './store'
export default class App extends Component {
state = store.getState()
render() {
return (
<div>
<h2>{this.state.count}</h2>
<button>增加</button>
</div>
)
}
}
index.js
中:
import React from 'react'
import ReactDOM from 'react-dom'
import App from './App'
ReactDOM.render(
<App />,
document.getElementById('root')
)
store/index.js
中:
import { createStore } from 'redux'
import reducer from './reducer'
const store = createStore(reducer)
export default store
store/reducer.js
中:
const defaultState = {
count: 22
}
export default (state = defaultState, action) => {
return state;
}
十三、提供器与连接器【重要】
1、Provider提供器
<Provider>
是一个提供器,只要使用了这个组件,组件里边的其它所有组件都可以使用 store
了,这也是React-redux
的核心组件了。
我们可以对 index.js
进行如下修改:
import React from 'react'
import ReactDOM from 'react-dom'
import App from './App'
import { Provider } from 'react-redux'
import store from './store'
// 定义一个app,来返回Provider组件
const app = (
<Provider store={store}>
<App />
</Provider>
)
ReactDOM.render(
app,
document.getElementById('root')
)
以上代码中,凡是放在 <Provider>
中的组件,都可以获取到store中的数据。
2、connect连接器
我们已经可以获取到数据,但需要在组件中设置连接器。
接下来,我们需要到 App.js
中进行修改:
import React, { Component } from 'react'
// import store from './store'
import {connect} from 'react-redux' //引入连接器
class App extends Component {
// state = store.getState()
render() {
return (
<div>
<h2>{this.props.count}</h2>
<button>增加</button>
</div>
)
}
}
// stateToProps是一种映射关系,把原来的state映射成组件中的props属性
const stateToProps = (state)=>{
return {
count : state.count
}
}
// 这里不再是导出App,而是导出连接器
export default connect(stateToProps,null)(App);
以上主要删除了store的引入,增加了连接器与映射关系。
3、事件派发
接下来我们需要点击按钮增加count,其实就是修改store中的count。
App.js
中:
import React, { Component } from 'react'
// import store from './store'
import {connect} from 'react-redux' //引入连接器
class App extends Component {
// state = store.getState()
render() {
return (
<div>
<h2>{this.props.count}</h2>
<button onClick={this.props.addCount}>增加</button>
</div>
)
}
}
// stateToProps是一种映射关系,把原来的state映射成组件中的props属性
const stateToProps = (state)=>{
return {
count : state.count
}
}
// dispatchToProps也是一种映射,用于传递并修改数据,这里要返回一个对象并包含一个事件
const dispatchToProps = (dispatch) => {
return {
addCount(){
const action = {
type: "add_count",
value: 1
}
dispatch(action)
}
}
}
// 这里不再是导出App,而是导出连接器
export default connect(stateToProps, dispatchToProps)(App);
reducer.js
中:
const defaultState = {
count: 22
}
export default (state = defaultState, action) => {
if(action.type === "add_count"){
const newState = JSON.parse(JSON.stringify(state));
newState.count += action.value;
return newState;
}
return state;
}
如此,我们就成功实现了对count的累加。
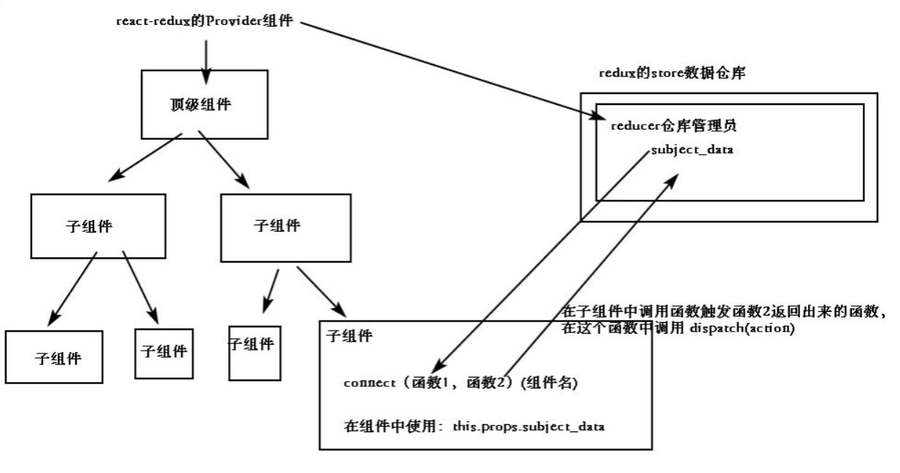
十四、ReactRedux流程图【了解】
十五、课堂练习【重要】
使用React-redux完成TodoList。
代码:
src/index.js:
import React from 'react'
import ReactDOM from 'react-dom'
import Add from './Add'
import TodoList from './TodoList'
import store from './store'
import { Provider } from 'react-redux'
import 'antd/dist/antd.css';
const app = <Provider store={store}>
<Add />
<TodoList />
</Provider>
ReactDOM.render(
app
, document.getElementById('root')
)
src/TodoList.js:
import React, { Component } from 'react'
import { Input, Button, List } from 'antd';
import { connect } from 'react-redux'
class TodoList extends Component {
render() {
return (
<div style={{ padding: '20px' }}>
<Input placeholder="请输入" value={this.props.iptVal} onChange={this.props.handleChange} style={{ width: '400px', marginRight: '10px' }} />
<Button type="primary" onClick={this.props.handleClick}>添加</Button>
<List
bordered
dataSource={this.props.data}
style={{width: '470px', marginTop: '20px'}}
renderItem={(item, index) => (
<List.Item onDoubleClick={this.props.dblClick.bind(this, index)}> {item} </List.Item>
// 或者是:
<List.Item onDoubleClick={() => this.props.dblClick(index)}> {item} </List.Item>
)}
/>
</div>
)
}
}
const mapStateToProps = (state) => {
return {
data: state.data,
iptVal: state.iptVal
}
}
const mapDispatchToProps = (dispatch) => {
return {
handleChange(e){
const action = {
type: "change_ipt_val",
value: e.target.value
}
dispatch(action)
},
handleClick(){
const action = {
type: "get_ipt_val"
}
dispatch(action)
},
dblClick(index){
const action = {
type: "del_arr_item",
value: index
}
dispatch(action)
}
}
}
export default connect(mapStateToProps, mapDispatchToProps)(TodoList)
store/index.js:
import { createStore } from 'redux'
import reducer from './reducer'
const store = createStore(reducer)
export default store;
store/reducer.js:
const defaultState = {
num: 0,
data: [
'第一条信息',
'第二条信息'
],
iptVal: ""
}
export default (state = defaultState, action) => {
var newState = JSON.parse(JSON.stringify(state))
switch (action.type) {
case "add_num":
newState.num += action.value;
break;
case "change_ipt_val":
newState.iptVal = action.value;
break;
case "get_ipt_val":
newState.data.push(newState.iptVal);
newState.iptVal = "";
break;
case "del_arr_item":
newState.data.splice(action.value, 1);
break;
default:
break;
}
return newState;
}
十六、作业
使用 React-Redux 完成 TodoList。